Saturday, March 31, 2012

Potholders with a Punch 101 {The Layered Effect}

Sometimes I just love my fabrics too much to part with the scraps so I have to make something out of them, sad, I know. Its a fettish and some day it will be my undoing, I tell ya!  So today, let's indulge my fettish and make some potholders with these great Kumari Garden scraps.  These are left overs from the rag quilts I make.  The blocks are 9"x9" so these scraps are the perfect size! I like to call this one, "The Layered Effect". Go gather your scraps, some heat resistant quilted backing and your scissors and pins and lets get started.  

Start by layering your fabrics vertically.  These are a double thickness so this is two layers of fabric for each fabric swatch you see.  Line these up so you have a pretty layout. Pin the layers in place.

Zig zag the over lapping edges, removing the pins as you go.  Whenever I decide I don't need to remove pins while zig zagging, I inevitably break my needle so I'll warn you now so you can avoid it.  :)  Trim the edges so you have a square.  I like to make mine 9"x9" but you can do 8"x8" or 10"x10" too.  Now your front is done. Cut a 9"x9" block out of the quilted heat resistant fabric for the back.

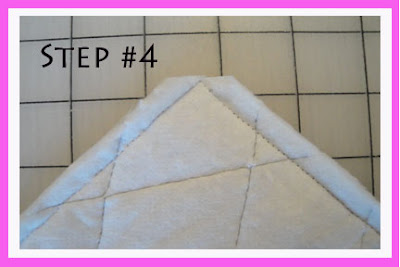
Lay the front on the back, right sides together.  Pin around the outside edges leaving a hole to turn the potholder inside out.  Back tack when you start and stop.  When finished, clip the corner at a diagonal to remove the bulk.

Turn right side out and top stitch around the edge.  You will stitch the hole shut that you used to turn it right side out when you do this top stitching.

Now go make a couple more so you've got a matched set and your scrap pile is a tad bit smaller.  Cheers!


Friday, March 30, 2012

{Fabulous Fabric Friday} Valori Wells Bliss Circles #Giveaway

Today I want to share this tantalizing circles flannel with you.  This would make a comfy pair of jammies while the nights are still cool this spring.  This fabric is part of the Bliss line by Valori Wells.  She makes some of my favorite flannels.  


This flannel fabric is a wonderful addition to a patchwork blanket, don't you think?!  The circles print ties the other ones together nicely and the texture is just right for a snuggle.  I call this the perfect blanket.  It doesn't have any batting it in, its backed in flannel.  Its ideal for a nap or a swaddle while your little one is fully dressed.  Take it along to daycare or preschool and your little one won't get too hot or too cold.  Its also the right thickness for a stow away since the bulky batting has been left out.  Smile, its perfect!


So what would you do with a yard of this great flannel fabric?  Tell me in the comments below for a chance to win it.


For extra entries you can:

Follow me on Facebook
Share this giveaway on Facebook 
Follow me on Twitter
Share this giveaway on Twitter 
Follow my blog 
Sign up for my newsletter (see sign up box on page footer) 

Please leave one post for each entry. Can't wait to hear all your ideas!   

Entries accepted until Sunday at midnight.  Winner drawn Monday.


Friday, March 23, 2012

{Fabulous Fabric Friday} Amy Butler Honeydew Buttercup #Giveaway

And I'm back at it with a Fabulous Fabric Friday.  Today I'd like to draw your attention to the gorgeous floral print above.  Amy's done it again, stole my heart with this modern marvel.  This is honeydew buttercup from her Soul Blossoms line.

I've had a lot of fun sewing this print up into all kinds of baby goodness.  Here is a swaddling blanket.  Can you ever have too many swaddlers?  I'm pretty sure you can't, but let me know if you ever encounter it.   Its background print is a Valori Wells pastel pom pom. Yes I'm still swooning over pom poms.  Where did my fainting couch go?!


Burp cloths are always fun in bright prints that pop. Here it is paired with Amy Butler's Passion Lily in Cerise Pink.  Love this set!

And last but not least, a patchwork blanket.  You'll see some of my favorite things in this one.  Brights, strawberries & chocolate, and a twist of lime.  Yum!
So what would you do with a yard of this great fabric?  Tell me in the comments below for a chance to win it.


For extra entries you can:

Follow me on Facebook

Share this giveaway on Facebook 
Follow me on Twitter
Share this giveaway on Twitter 
Follow my blog 
Sign up for my newsletter (see sign up box on page footer) 

Please leave one post for each entry. Can't wait to hear all your ideas!   

Entries accepted until Sunday at midnight.  Winner drawn Monday.


Saturday, March 17, 2012

Potholders with a Punch 101 {Bermuda Triangle Potholder Tutorial #1}


So in February I did my fabric destash and studio clean up.  It felt sooooo good!  I cleared new space in my studio, donated some fabric to worthy causes (for me this is school, daycare, church or my nieces) and did a little organizing and catch up on projects.  It always feels good to do some spring cleaning and I've made leaps and bounds in the last 30 days.  This month I get to share some of my projects I made with my stash.  So, strap on your flip flops (its 80 degrees here so flip flops are NOT optional) cause fabric is about to start flying!


The first potholder I'm going to show you is the Bermuda Triangle.  This style shows off up to 4 fun prints.  Go gather your scraps, some heat resistant quilted backing and your scissors and pins for this project.


Start with cutting 4 squares all the same size of your front fabric and cut one square in the same size of the heat resistant quilted fabric for the backing.  The block can range in size from 8-10" square. I made mine 9" square.  


Fold the front fabric square into a diagonal, matching corners and press well. Repeat this with each front square.


Layer pressed triangles on top of each other into square.  When you are finished it should look like this.
Put heat resistant quilted backing on top of this square with pretty sides together and pin. If you want to add a tab to hang the potholder, pin this in one corner before stitching the front to the back.  Leave an opening so you can turn this right side out.  Stitch with 1/4" seams, back tacking at the beginning and end.  Don't forget to leave the hole!
Clip corners at an angle to remove bulk, be careful not to cut into the seam. Turn right side out. Top stitch outside edge, sewing opening shut where you turned it right side out.  I also top stitched around edges of triangles in the center for extra durability.


All done and ready to use or give as a gift.  Hope you enjoyed this quick little tutorial and you pack your potholders with a punch!

Saturday, March 10, 2012

Delight Guests: Hoot Owl Themed Baby Shower {Divine Twine Tip}

Is there anything more exciting than welcoming a new baby?  It doesn't really matter who's baby it is, its always exciting to me.   Its a season with so many new firsts, its exhilarating and terrifying all at once.  Having kids is one of the most rewarding experiences in life.  I don't know if I love babies so much cause I'm the oldest of 7 kids and loved growing up in a large family or just because I love babies, but I agree with my momma.  She said, "If I didn't ever have to "get old" I might not want to ever stop having them."  Tru dat!  Well I parted with all my baby stuff a long time ago, but doesn't mean that I don't miss the late night feedings (yes that is such sweet connecting time even though its late), first steps, making homemade baby food, and chubby cheeks to kiss whenever I feel the urge. *sigh*  My "baby" is graduating from preschool and daycare and starting Kindergarten this fall.  Not sure if I will wa-hoo! or boo-hoo when we drop him off at his first day of school.  Well I've still got a few months to figure that out. Back to the baby shower!
So one of my customers, Lauren, shared the pictures of her Hoot Owl themed baby shower she hosted for her friend, Jaime, and baby Chloe.  Aren't these cupcakes adorable?  These toppers are great to make ahead so you can just pop them in the cupcakes at shower time.  Adds fun and festivity to the table instantly!
She made this adorable bunting in baby Chloe's name and hung it on a mirror.  Don't you just love the hoot owls on this?  Right below this bright themed banner is the advice tree for Jaime, the momma.  Guests shared advice and wishes on these cute little hoot owl shaped cutouts.  The advice tree tied in with hoot owls is so perfect since owls are known for their wisdom.  Hoot owls are also theme for baby Chloe's room, so she will have lots of uses for all these cute accessories.
The cutouts were slipped on divine twine thru the punched hole and hung on tree branches placed in a vase.  This is an ideal and easy way to create a memory for Jaime and Chloe and its eco-friendly to boot!  I say wahoo to that.
Another great way they utilized Divine Twine was hanging some cozy little jammies and onesies on a line of twine over the table.  It made a suiting backdrop for the table, don't  you think?  The best part about this is that its a gift and decorations all in one.  
I just love hearing from customers so if you have some ideas on how you've used Divine Twine that you'd like to share, please send them over!

*all images used with permission*

Friday, March 9, 2012

{Fabulous Fabric Friday} Ty Pennington Chartruese #Giveaway

Its Fabulous Fabric Friday and today I'd like you to set your eyes upon this gorgeous Ty Pennington Impressions 6 pack.  Let me introduce you to these prints starting in the top left, going left to right.  

I just love these prints and colors that Ty put together, I mean for a guy, it's some nice looking eye candy, right ladies?!  Now let's get some sewing inspiration...here is a cute zippered wristlet by wooden45.  This is a punchy little number for spring.  Not only does it put a spring in your step but also will put a smile on your face!

Now how about a little attitude for your morning cup of java?  Ditch the cardboard cuffs that just end up in the garbage anyway and grab for a sassy little cozy like this one.  This bright sleeve is sure to spice up your morning joe.

So what would you do with a yard of one of these great fabrics?  Tell me in the comments below for a chance to win it.  For extra entries you can:

Follow me on Facebook
Share this giveaway on Facebook
Follow me on Twitter
Share this giveaway on Twitter
Sign up for my newsletter (see sign up box on page footer)

Please leave one post for each entry.
Can't wait to hear all your ideas!
  
Entries accepted until Sunday at midnight.  Winner drawn Monday.

Friday, March 2, 2012

{Fabulous Fabric Friday} Indian Summer Flower #Giveaway

TGIF--I live for Fridays, don't you?  What better way to start the day off than gazing at a fabulous fabric.  Today I want to show you this Indian Summer Flower fabric from Riley Blake.  I love the unexpected color combinations in this modern print.  

Need some inspiration to start a project in this fun line?  Look at this gorgeous baby blanket by Freckled Finch Kids.  The placement of the white strips between rows, sets the colors on fire!

Here is an adorable ruffle skirt made in Indian Summer prints by Paisley Pockets. Now wouldn't any little girl love to twirl in something so pretty?

I have a fettish for flannel and also for polka dots so I have this in several colors in flannel.
  
These would make a sweet pair of PJ's or some funky potholders.  You can never have too many potholders I've found.  One of my favorite things to make with flannel is baby swaddlers.  I make them plenty big and square for the perfect swaddle.  This makes babies content and momma's ecstatic so they can catch up on much needed sleep.  So swaddle up!


So what tickles your fancy?  Tell me in the comments below what you would do with this fabric to win a yard of this delicious print.  For extra entries you can:

Follow me on Facebook
Follow me on Twitter
Sign up for my newsletter (see sign up box on page footer)

Please leave one post for each entry.
Can't wait to hear all your ideas!
  
Entries accepted until Sunday at midnight.  Winner drawn Monday.