Wednesday, October 29, 2014

Kitchen Cabinet Makeover

Well this post has been a long time coming but I finally got the whole thing documented, found some "before" pictures and took some decent "after" pictures.  This is what our kitchen cabinets looked like when we moved in, below.  80's medium honey oak with white knobs that were falling off left and right, literally.  This was a little too traditional for my modern industrial lake vibe so, here we go, making it our own!
Our kitchen faces north so we don't get a lot of sun blazing in the kitchen windows so I wanted to lighten it up as much as possible.  This door leads out to the lake so I want it to feel light and sunny and beachy year round, even if you're looking at snow.  ;)  I've been dying to DIY some cabinets and researching different techniques and ideas for a long time.  In order to get huz to bite on this HUGE project I had to have a system that would ensure the cabinets we painted over a 3-6 month stretch would all look the same when we were finished. We also had several sections of cabinets on different walls that we did at different times based on the rest of our kitchen remodel so it all had to look cohesive when it was finished. We chose the Rustoleum Transformation Kit from Home Depot.  Each box of the kit does roughly 10-12 linear feet of cabinets, however we veered off from the kit and didn't use part of it.  I'll outline our technique below.   

To start, remove all the door fronts and drawers, keeping all the hinges and screws and hardware to reuse later. Or if you don't intend to reuse, donate them. Also remove all the foam/cork/vinyl bumpers so you can paint easily on all flat surfaces.  We painted all the doors and drawers in our garage and did the base cabinets in the house where they were mounted.  The nice part of this is you don't have to remove most of your contents of your cabinets where there are doors. Drawers--not so lucky, but we dumped out all the drawers in piles on the floor on beach towels so we could go find the right drawer when we needed something out of it.  This is also a good time to destash so if there is anything you don't need anymore, get rid of it.  This should get me some points with the huz, his name could be Mr. Destash!

How we did it:

1. Start off by applying the deglosser.  Brush or wipe this on with a rag, scrub with the pad provided and wash with soap and water.  Dry well.

2. Next is applying the base coat in the kit, note that you can get this tinted in the store if you are not wanting a white base cabinet.  We did, so ours was not tinted.  The kit recommends 2 coats. We applied 4 coats front and back cause huz did not want any brush strokes to show.  This is the slow part as you have to do both sides of the cabinets and wait for them to dry in between coats and sides.  Thank goodness we have a heated garage (we did this most of the winter and MN winters are long) as this made for a nice space to spread out, keep the fumes out of the house and not rush the process.  The irony in this is after he worked so hard to get the brush strokes out, I put them back in, in the next step. I love the grain of wood!

3. Glaze.  The kit supplied a stain that you apply to your painted cabinets as a glaze.  All stains have a yellow/orange warm toned base and I wanted the cabinets to be a cool tone.  Thus I implemented my own glazing process.  First we selected the wall color paint which was Sherwin Williams Mindful Gray. 

I applied a thinned down version of the Mindful Gray with a paint brush and some rags. I brushed it on and then wiped off any excess or anything that got too dark. I ended up with one set of cabinets that got too dark so I had to apply the base coat again so I could start over. I recommend doing this glazing part all in one day if you can so it looks the same on all your cabinets and you don't have to redo any like I did.

I wanted the white to show through but wanted to pull out some of the wood grain and brush strokes.  Here is a close up of some drawer fronts after the paint glaze was applied.


 4. Protective Coat.  Apply 2 coats of the clear top coat finish letting them dry well in between coats.  Apply new vinyl or cork bumpers. Last but not least, put hinges and new hardware on and step back and enjoy your work.  You deserve to kick back and relax for awhile! And that's exactly what we did for the entire summer.  


This was more labor intensive but inexpensive compared to other options for refacing or refinishing cabinets.  Plus our cabinets were not old or in poor condition so they didn't need much more than the facelift and a little DW-40 to get them rolling with ease and style again.  We purchased 3 transformation kits (I got one on sale), paint, bumpers and new hardware for less than $400. And I still have some left to redo a door for a future project.  In my book that is money well spent for the transformation it has made to our kitchen.  Next up is the backsplash, flooring and a hood over the stove. Can't wait!  

What are you working on this fine Wednesday?  I'd love to hear about it!

Wednesday, September 24, 2014

Concentrated Laundry Soap Recipe #WIWW

I've been toying with the idea of making my own laundry soap for awhile now.  I had rounded up all the supplies to make a 5 gallon batch but I realized I really didn't like the idea of needing to regularly handle that much soap and find goofy containers to store it in.  I had visions of my huz putting the laundry soap that I had poured in a milk jug in the fridge. Or if I put it in a standard laundry soap container using way too much of it.  Yep that could totally happen in this house.  So I set off to find a more concentrated recipe that I could store in pint sized canning jars as countertop space is always limited in a laundry room, right? I also wanted to keep the recipe as simple as possible. I think I accomplished both goals.  My version is a mix between liquid and solid so I won't call it "liquid" laundry soap.  If you add more water it would probably pour but then it would take up so much more space and need larger containers so I like it like this. I keep a tablespoon by the jar in laundry room and wash it and any extra soap off in the water streaming into the washing machine.

Recipe:
1 Bar Fels Naptha Soap, grated
1 Cup Washing Soda**
1 Cup Borax
3 Cups Water

I used my cheese grater for the soap, I've read that other people use a food processor to chop it up. Doesn't take long to grate it by hand and was an easy clean up.  Plus I always view hand grating cheese as part of my workout.  :)
Heat water, stir in grated soap.  Make sure it doesn't boil or it will make a LOT of bubbles. Once all the soap is melted add washing soda and borax.  Stir thoroughly.  Pour in jars or other container to cool overnight. Separation is normal and sometimes crystals will form on the bottom.  If you want to add essential oils to this you can. I put about 10-12 drops in each jar.  Next time I think I'll do more as I can't really smell it in the clean laundry.
Chop up the top hardened layer and dump in your blender.  I use a Vitamix and it does a really good job.  Love it! At this point I used some really HOT water out of the tap to rinse the jars out.  I added this to the blender since I didn't want to waste it and I also needed a little extra liquid in the blender to get it to mix smoothly. I didn't measure this, but my guess was about a cup per jar so an additional 2 cups of hot water added. Here's what it looked like after it was blended.

It has the consistency of butter.  I use 1 tablespoon per load.  4 jars like this should be able to wash approximately 128 loads.  Based on all the other recipes I've researched this stuff has a great shelf life so no need to make it in small batches if you are worried about using it up by a certain time.  I already had a open box of Borax from making slime with the boys and a HUGE bag of Baking Soda that would take me about a jillion years to use up, thus the reason for researching the difference between baking/washing soda, below. The only thing I had to purchase for this was the bar of soap. Not bad for less than a $2 investment!  For future batches all I need to pick up is the bar of soap. I have also read that Zote soap or Ivory soap work for other recipes so I might try that or maybe a homemade bar soap from my local shop on the next round.

I've read that you can apply this concentrated version of the laundry soap to stains.  Can't wait to try this...I should have a grass stain coming my way on the boys' clothes soon, right?  :)

Ok, last but not least, I added washi tape for decoration and a removable chalk board label to my jars.  I mean washi tape is so fun.  I believe Baran's (11 years) exact words were, "Mom, why did you put tape on the jars?"  Isn't that obvious, cause its fun of course.  Boys!  They don't understand pretty things at all, do they?  And the removable chalk label is necessary so the fam knows what this is and how much to use just in case they want to handle some laundry duties.  A girl can wish, right?

**I was wondering what the difference is between washing soda and baking soda so I googled it.  Come to find out you can make your own washing soda with baking soda just by baking it at 400* for 30 minutes.  Here is a link to the explanation from Lifehacker.com.  It also saved me from having to purchase one more ingredient that most people already have.

Do you have your own laundry soap recipe?  I'd love to hear about it!

Tuesday, September 9, 2014

Upcycled Pinspiration

  • Upcycle [uhp-sahy-kuh l]
  • verb.    To process (used goods or waste material) so as to produce something that is often better than the original. Example: I upcycled a stained tablecloth into curtains.

Upcycling—it’s a buzzword these days. Taking items that might be on their way to the dumpster or landfill and creating something new + beautiful is the ultimate example of waste not, want not.

In addition to being eco-friendly, upcycling is a lot of fun! A few of my favorites include:


By upcycling old t-shirts into bags, you’re not only doing the Earth a favor, you’re creating a tote with personality. Choose favorite tees in great colors and themes, and designate bags for the grocery store, farmer’s market, or gym. Love the tied fringe on the bottom of this one!


So, turns out that wine bottles are actually one of the least green ways to go. That’s because glass bottles require an immense amount of energy to make and ship, so their carbon footprint is pretty massive. However, if boxed wine is not your thing, at least you can feel good about upcycling one part of the bottle—the cork! Begin collecting now, and have your friends and family save their corks as well.  Want to see what I did with mine?


With darkness falling earlier and earlier this time of year, lanterns are a beautiful way that allow you to linger in the screened in porch a little longer. These, crafted from tin cans that are painted and punctured with pinprick holes, are not only environmentally conscious, but far less expensive than their counterparts. 

What have you upcycled lately?  I'd love to hear about it!

Friday, August 29, 2014

Pie #Recipe with Flair

My huz loves pie.  In fact, he frequently says, "Wife, get in the kitchen and make me some pie!"  His mom can whip up a half dozen of these without even breaking a sweat.  My grandma, Evangeline, (Vangie for short) used to do the same thing.  Bring 4-5 pies every where you went, making it look so easy.  Yeah right!   So we both grew up eating pie, and very good, flaky crusts, I might add.  The problem is, I never really made any.  In short, I stink at making pie crust.  This week we got a crate of peaches cause they are in season and oh-so-yummy!  The crate has been staring me down, daring me to make a pie so I did just that.
I was quietly cutting my butter into the flour when Owen walked in the kitchen to find out what I was doing. I whispered, "I'm making a pie for daddy."  He asked me, "Why?  Did he do something good?" LOL, I love how kids think!  After I actually did laugh out loud, I responded, "No, just cause I love him, and he really likes pie."  And I'm a Scandinavian American, for heaven's sake.  I should know how to make pie and lefse without a recipe, I thought to myself.  AND it should be good!  The reason we were whispering is I'd rather huz not know if I flopped it, just in case that happened.  Just hide the evidence and try again some other time.  Logical, right?

So I dug out this recipe from my grandma. Its written in her handwriting so its very special to me.  Side note: grandma makes pie up in heaven now. If I'm guessing correctly she has probably given herself the title of "Vice President of Pie Baking".  She's a bit bent toward being dramatic and I have a little bit of her #flair.  :)  
She wrote this recipe up for me shortly after I got married and realized I was missing this essential skill: Pie Making.  We of course scheduled a pie making party pronto!  Grandma was very "hands-on".  By that I mean she used her fingers to "feel" the dough.  I kind of like the pastry blender, its so....clean. This may be my core problem.  While she whipped flour all over the kitchen, my sister and I stepped back and giggled.  Pretty much anything that involved grandma Vangie also meant a fit of giggles.  Til we were crying from laughing so hard.  The more we laughed the more she embellished and threw flour--literally.  She also was very stern about not handling the dough too much.  If we did, it would turn out tough like Baker's Square.  Oh dear. I've never thought Baker's Square pie was tough.  Now I'm really in a pickle, how do I know if my pie crust is good?  Please let my crust be flaky!

As I thought back to all grandma's advice I muttered out loud that I can't handle the dough too much or it will get tough.   Owen assured me after helping me complete this pie that it was going to be good. He said it looked just like the cartoons.  He also said it looked so good that he was going to try pie for the first time.  This is huge for my picky little eater and it warmed my heart that he would try something new just so he could encourage me.  He did try it and I got a thumbs up.  He said, "Yep, mom, the crust is flaky." Woot!

So I made a few modifications to the recipe.  I substituted butter for the Crisco.  My momma says butter is better.  We agree!  I skimped on the salt, no heaping here, just a few shakes.  I also only put about 1/4-1/3 cup of sugar on the fruit as it was extremely sweet already. I added about 1/4 cup of flour since the peaches were really juicy and about a teaspoon of cinnamon cause it rocks the flavor.  We topped it with some whipped cream so you didn't even miss the extra sugar.  And don't forget to add the love, its the most important ingredient!

I know Owen doesn't know the difference between tough and flaky crust since this was his first time eating pie, but it has boosted my confidence.  I'm going to try for an apple pie this weekend.  Cause what is more Scandinavian American than apple pie?  #practicemakesperfect Have a great holiday weekend!

Wednesday, August 6, 2014

Ice Cream Sandwich Cake #Recipe {What I Worked on Wednesday}


This ice cream cake turned out amazing and was super simple to make.  Here's how I made it....

       Ingredients:
  • 2 boxes of 12 sandwiches
  • 2 pints of whipping cream
  • Vanilla
  • Powdered Sugar
  • 2 pounds of cut fresh Strawberries
  • Hershey's Syrup

Layer ice cream sandwiches in a 2 x 6 row, making a square on a jelly roll pan.  Lay them side by side with no gaps.  Mix up one pint of whipping cream. I add about 2 teaspoons of vanilla and 3/4 cup of powdered sugar. My favorite way to whip this is in my Vitamix.  It takes about 1 minute and its whipped cream.  Spread the whipped cream on the first layer.  Put your second layer of ice cream sandwiches on top of the cream in the 2 x 6 layout.  Mix your second pint of cream up and spread over the top.  Cover and freeze for 3-4 hours.  Top with strawberries and Hershey's chocolate before serving.  

This was a total crowd pleaser at my sons birthday party and only took minutes to whip up.  Woot!  What are you working on this fine Wednesday?

Thursday, July 17, 2014

Studio #Organization for Pretty Little Things

We've been really busy working on our little remodeling project and now that some of the projects are getting finished its time for the fun stuff.  Organization, woot! Some days getting completely organized seems to be an unattainable task. However, living in chaos is a choice that no one should make, as being disorganized actually makes life so much harder. If you’re a sewista, all your supplies can quickly grow out of control, causing you stress and money when you wind up buying things you actually don’t need. Instead, if your life is not quite as pulled together as you wish it to be, make a plan to organize one aspect a day—and make it fun! 

A few of my favorite ways to get organized, beautifully:

A fabric filing cabinet? Brilliant! Anyone creative knows that fabric stashes seem to multiply. This system files fabric neatly while allowing it to be accessible, so you can see what you have with just a glance. Love it for anything under 1 yard in length!


Glass jars are beautiful, and when they feature gorgeous fabric lids like these, they effortlessly become part of the décor. These jam jars can stash tiny items—think push pins or paper clips. Top them with your favorite fabric scraps cut to fit and voilà.  So pretty!


Baker's twine can be anyone's worst enemy, as the unraveling process can cause you to unravel, too. Instead, stop it pronto with this ingenious sugar jar idea.

When our management methods include or result in something beautiful, tasks become less daunting and more appealing. What are your favorite tips for organizing your space to make it easy on the eyes?  I'd love to hear them!

Wednesday, May 7, 2014

{Flowers for Mother’s Day That Will Never Fade Away} #DIY


Our moms are the greatest, aren’t they? Whether they’re patching up skinned knees or providing support when our first baby is born, mothers are pillars of strength throughout our entire lives.

Mother’s Day is the time we show Mom our love, but it’s simple to let the holiday slip into cliché territory. Nowadays, it’s easy to run into any local supermarket, grab a board game-sized box of chocolates or some limp refrigerated carnations, a quick card, and call it a day. And just like that, the entire meaning of Mother’s Day has been lost. The point of this day shouldn’t be about minimal effort, it should focus on appreciating the lady who gave you life, love and really great looks. (Genes rule!)

So, take a moment to reflect on the important role your mother plays in your life, then think about how a handmade gift would be a more appropriate token of love. After all, handmade = from the heart. Instead of a supermarket bouquet, why not peruse my pinterest boards and try one of these sweet flower crafts? They’re fun, original and have more staying power than cut roses.

Layered Fabric Flower

This precious layered fabric flower from Cluck Cluck Sew is sweet, cheerful—and deceptively easy. I love that it can be made from scraps you have already, making it the perfect eco-friendly gift.


Baking Cup Flower

The blog Skip to My Lou had these adorable baking cup flowers as a Valentine’s activity, but I’m thinking this is the ideal gift for chunky preschool and early elementary hands come Mother’s Day. They don’t require a lot of materials, so they’re a super activity for young kids. (Room moms, take note!)


No-Sew Fabric Flower

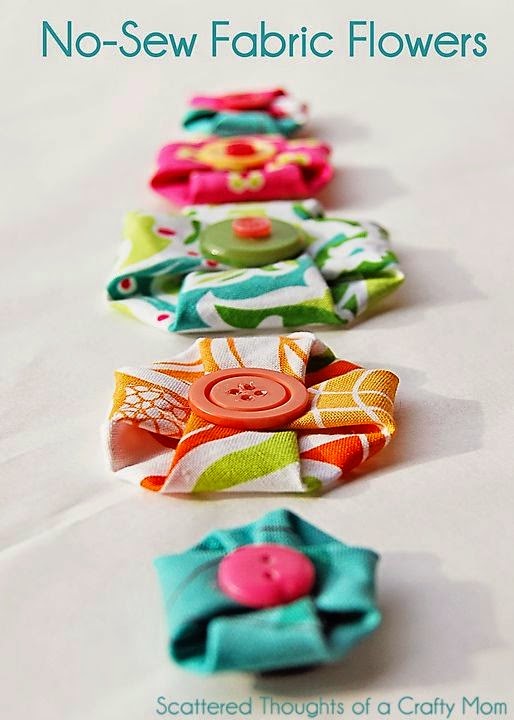
Finally, Scattered Thoughts of a Crafty Mom has these no-sew flowers that use fabric scraps and some hot glue. Great to pile together for a fun fabric bouquet, or maybe attach to a simply wrapped gift for a pop of color.


Whatever you give Mom this Mother’s Day, make sure it’s #handmadewithlove!

Monday, April 21, 2014

All Patched Up {Eagle Lake Elementary Art Week}

Our Project: Patchwork Pinwheels 

Our tables all ready for students to show up. Pattern + fabric is scattered around, just ready for some creative kids to turn it into something pretty.

We talked about repeating patterns and the kids drafted their own triangle patterns to cut around.  Here is a peek at one of the first ones getting made.  Cute chevrons!

Here is Mrs. M giving instruction with the video cam on proper gluing technique.  She is so smart, I wouldn't have figured out the kids needed coaching on how much glue to use until all the projects were dripping with it. Experience really is the best teacher, isn't it?  ;)

Here is a different twist on the pinwheel style. Cutting all those triangle pieces out of fabric is hard work, but the kids were such champs.  Excellent cutting skills, I was impressed! 

Here is a super bright one. Looks like summer, don't you think?

Here is one with a Heather Bailey print. I think she'd like it.  Two thumbs up here.

It was a successful day and I think there are some future sewing enthusiasts roaming those halls.  I can't wait to see the patchwork wall once all the classes have completed their squares.
Thanks for the fun time and allowing me to spend time with your students. Can't wait to do it again tomorrow!  #spreadthehandmadelove

Wednesday, April 2, 2014

Gender Neutral Nursery {What I Worked on Wednesday}


Sewing for a new baby is always an exciting project! I had the honor of working with two sisters designing for this custom sewn nursery.  Gender was unknown,  which is so fun. This entire room is a handmade bundle of love.  Where should we start?

The tab curtains were made out of  Premier Prints Free Hand Twill. I love how playful this print is and that it looks hand drawn. How ideal for a child's room.

The fabric bunting was made out of grey and yellow coordinating prints.  The parents chose to hang it over the window and I think this is a very festive spot for it, don't you agree?

To the left in the chair is a floor pillow made out of a yummy plush minky.  This will be perfect for play time on the floor, pillow fights and the ocassional family movie night as their little one grows up.  I also hear that the family pooch may have claimed this as the perfect doggie pillow.  :)


This photo shows off the dresser runner in Riley Blake Chevron.  I also love the little white puppy hat that looks just like the family dog.  Last is a framed sliver of sunshine with each ray containing a handwritten message from family and friends.  What a special gift for this baby!


In this photo is a custom made crib sheet out of Riley Blake Dot Fabric. We also made a few other coordinating crib sheets in various prints.  The monogrammed chevron pillow with the "E" on it gives us a hint at what baby's name will be.  The "E" is made out of a silky yellow fabric and edged in white thread.  Wall art was thoughtfully coordinated and purchased on etsy.


One more picture to show off  this adorable stuffed elephant.  What a fun room to bring the new baby home to.  Congrats on your bundle of joy and thanks for letting me be part of this awesome project!

What are you working on this Wednesday?

Wednesday, February 12, 2014

Monster #Valentine {What I Worked on Wednesday}


My boys instantly fell in love with these little monsters to give for Valentine's day. One of my sons doesn't like candy so he opted to give this to friends instead of a treat.  Here's how you make them.

Supplies: Yarn, post-it notes, scissors, pipe cleaner, wiggle eyes, glue

Get a standard size pack of post-its to wrap the yarn around.

Wrap yarn around 50 times and cut end.

Slide off post-it note.

Twist a 5"-6" pipe cleaner around the center.

Cut the looped yarn to make the monster "poofy" like a pom-pom.

Glue on wiggle eyes and give as a gift.

Happy Valentine's Day!